Location
Several times, you may need to input more than one data item at a node, e.g., a hanger and a Branch SIF to designate the type of tee. At those times, use Location (press “L” in the Type field or pick Location from the Element Types dialog) to input more than one data item at a node. For example, you may want to input a lateral restraint at an existing hanger.
Another use for Location is when you want to input a data item at an internally generated node. Nodes are internally generated by CAEPIPE for bends (A, B nodes, e.g., 20A) and Jacketed pipes/bends (J, C, D nodes, e.g., 10J).
By design, each row in the Layout window allows only one data item to be entered under the Data field. Additional data items can be input only through Location (see Examples below).
Ensure that the node you use for Location has already been defined on an earlier row, or defined earlier as an intermediate node for a bend or is an internally generated node. In other words, you cannot use Location on an undefined node.
Example 1: Multiple Limit Stops at a node to model Pipe Slide and Shoe assembly
See Example 2 under the Limit Stop topic in this manual.
Example 2: Data at internally generated nodes
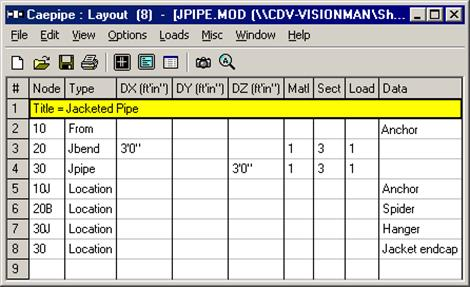
Refer to the example given under the Jacketed Piping in this manual. CAEPIPE internally generates J node on the jacket for a Jacketed pipe and the C and D nodes on the jacket for a Jacketed Bend. The following 4 data items present in that example are input using the Location type as shown in the Layout window below.
1. Node 10J is the starting Jacket node which is anchored (node 10 is separately anchored, since it is the node on the core pipe).
2. There is a hangar at node 30J since the hanger is connected to the Jacket.
3. There is a spacer (spider) at the far end of the bend, node 20B (which is on the core pipe). Remember that the bend has a jacket on the outside.
4. Node 30 has a jacket end cap
See Example 6 in the Bend section of this manual to locate a hangar at an intermediate node.