
Software Solutions
- CAEPIPE 3D+
- dataTRANSLATORS
- checkSTRESS
- HOTclash
- PEXit
- Pricing Request
- Download CAEPIPE 3D+
- Download Free Evaluation
- Download Free Review Module
- Customer Support
Engineering Services
- Design and Engineering
- INFOplant™ System
- Engineering Management
- List of Projects
- Project Gallery
- Project Videos
Learn More
Company Information
Tips January - March 2003
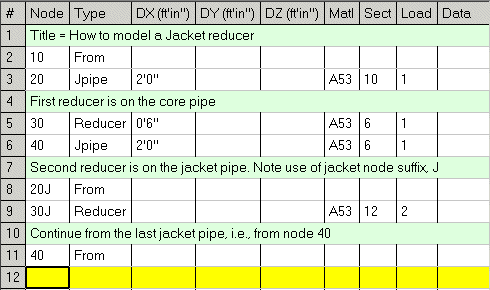
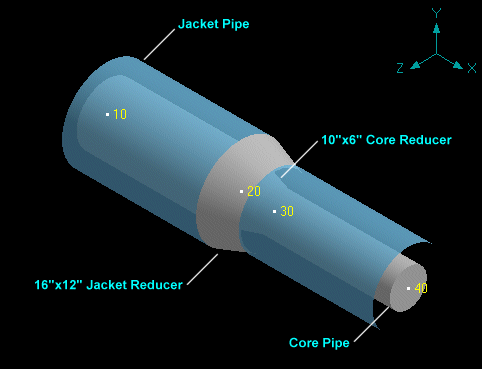
Modeling a Jacket Reducer in CAEPIPE
You probably already know how to model jacketed piping in CAEPIPE. This feature is one of CAEPIPE's unique strengths.
Presently, as we do not have a jacket reducer element, you need to add a couple of more rows to model one.
In the jacketed piping example below, core pipes run from 10 through 40, and jacket pipes from 10J through 40J. CAEPIPE automatically creates a J node for each jacket pipe (JPIPE) that you input.
When you input a reducer from 20 to 30 (row 5), CAEPIPE takes it to be a reducer on the core pipe. You still need to input another reducer on the jacket pipe. Hence, the extra couple of rows of input (see rows 8 and 9 in the layout window image).
This jacket reducer is always between two jacket nodes (nodes with the suffix J). So, be sure to type it after the node number.
Using CAEPIPE-Eval as a Viewer
Did you know that you can include a copy of CAEPIPE with your input and results files when you send your project report to your client? A few advantages of this method are:
1. Your client can see your work in the intended manner - Interactive, Visually communicative and Flexible (in report generation). There will be better communication between you and your client on changes or modifications to the project.
2. You do not have to mail a hardcopy of the CAEPIPE report, maybe multiple times (saving you more time, trouble of generating reports and the courier charges).
3. Your client will certainly appreciate the fact that he/she does not have to pour over hundreds of pages.
4. Your client can generate selective portions of reports as he/she requires.
5. Your client can archive the whole project easily. He/she simply saves the model input and output files along with the CAEPIPE program (will easily fit on a CD).
Here is how to send CAEPIPE as part of your report:
1. Download CAEPIPE Evaluation copy from our website,
2. Assemble all of your project's CAEPIPE input (.mod) and output (.res) files, (for time history analysis, also send .rth)
3. Send an email to your clients with items 1 and 2 attached to it.
Notes:
CAEPIPE-Evaluation can read all input and output files, any size (from its version #). Example: CAEPIPE 5.1H evaluation copy can read input and output files from versions 5.1 to 5.1H. But, it won't be able to read models from v5.02x or from a version later to it, e.g., 5.2x).
As you may know, the Evaluation copy cannot save or analyze files (over 20 rows of input).
The only prerequisite is that you use the same full CAEPIPE version as our evaluation copy on the website.
This useful feature is available to your clients anytime they wish. They can print their own reports, examine a section of results interactively instead of passively looking at reports (even though our reports are on average 150% less than others').
It will be just more of an advantage to you if you submit your reports this way. Let us know what you think (support@sstusa.com).
Reinforced Fabricated Tee not as per Section III NB-3643.3 guidelines
Question: What does one do when the reinforcements for Reinforced Fabricated Tee do not meet the guidelines (e.g., when the reinforcement zone is less than specified) mentioned in ASME Section III, Division 1, NB-3643.3?
Reply: The conservative way is to treat this Reinforced Fabricated Tee as an Unreinforced tee.
Ron Haupt adds: For more elaborate modeling, you could interpolate between an unreinforced fabricated tee SIF and a reinforced fabricated tee SIF based on a ratio of 2 times the actual pad width plus the branch outside diameter versus the reinforcement zone width, normally 2 times the finished branch inside diameter.
Author: Mr. Ron Haupt, P. E., of Pressure Piping Engineering (www.ppea.net) is a member of several piping code committees (B31, B31.1, B31.3, BPTCS, and others). He consults with us in the capacity of Nuclear QA Manager.