Software Solutions
- CAEPIPE
- CAEPIPE 3D+
- checkSTRESS
- dataTRANSLATORS
- HOTclash
- PEXit
- Pricing Request
- Download Free Evaluation
- Download CAEPIPE 3D+
- Download Free Review Module
- Customer Support
Engineering Services
- Design and Engineering
- INFOplant™ System
- Engineering Management
- List of Projects
- Project Gallery
- Project Videos
Learn More
Company Information
Tips April - June 2000
How to Improve Your Efficiency Using CAEPIPE?
Part 2 - Speeding up Data type input
Continuing from Part 1, let us examine now how we can save ourselves more time and become more efficient by examining another aspect of Input (Layout window): Keyboard shortcuts for inputting the Data types.
For those of you that have not read the previous part, the purpose is to become efficient in inputting model information by exploiting the various keyboard features because the keyboard still remains the more efficient and ergonomic method for inputting data compared to the mouse.
Data types in CAEPIPE refer to anything (available) that is input at a node, i.e., putting in information that pertains to the node. In contrast, an Element (discussed in part 1) is between two nodes such as a bend. But, a data type is at the node. Examples are an Anchor, a flange, an SIF, a hanger, a bilinear or a bidirectional support and so forth.
As an example, let us input an Anchor at a node using the mouse and the keyboard.
Using the mouse: Assume you just typed in the DY offset for a row, and now you would like to input an anchor in the Data field in the same row,
- move your hand from the keyboard to the mouse,
- position the mouse in the Data field (of that row) where you need to input an Anchor,
- right click in the field to open the Data types dialog,
- move the mouse pointer to Anchor,
- click once on Anchor (CAEPIPE puts an Anchor and moves the cursor to the next row)
Using the keyboard: Assume you just typed in the DY offset for a row, and now you would like to input an anchor in the Data field in the same row,
- Press Ctrl+D to move the cursor to the Data field, (alternately, you could press Ctrl+Shift+D to select any other Data type from the Data types dialog)
- Type "a" (CAEPIPE puts an Anchor and moves the cursor to the next row)
You just saved yourself 3 operations! Not merely clicks, mind you, but hand movements. Do you see how efficient (and fast) keyboard shortcuts in CAEPIPE can be?
Here is the list of keyboard shortcuts for Data types for you to try out.
| A | Anchor (rigid) |
| B | Branch SIF (Welding tee, Branch connection etc., depending on the selected piping code) |
| C(Enter) | Concentrated Mass |
| CONC | Concentrated Mass |
| CONS | Constant Support hanger |
| F(Enter) | Flange |
| FL | Flange |
| FO | Forces (and moments) |
| G | Guide |
| H(Enter) | Hanger (to be designed) |
| HA(Enter) | Hanger (to be designed) |
| HAN | Hanger (to be designed) |
| HAR | Harmonic load |
| J | Jacket end cap |
| L | Limit stop (default is 1-way vertical support) |
| N | Nozzle |
| R | Restraint (2-way) , see X, Y, Z below |
| RO | Rod hanger |
| S(Enter) | Skewed restraint |
| SK | Skewed restraint |
| SN | Snubber |
| SP | Spider (for Jacketed piping) |
| TH | Threaded joint |
| T(Enter) | Time varying load |
| TI | Time varying load |
| U(Enter) | User hanger |
| USER S | User SIF |
| W | Weld |
| X | X restraint (2-way) |
| Y | Y restraint (2-way) |
| Z | Z restraint (2-way) |
How to Improve Your Efficiency Using CAEPIPE?
Part 3 - Rapid Editing in the Layout Window
From input (Part 1, Part 2, see above), we now take a look at editing data that already exists.
For those of you that have not read the previous part, the purpose is to become efficient in inputting model information by exploiting the various keyboard features because the keyboard still remains the more efficient and ergonomic method for inputting data compared to the mouse.
The keyboard shortcuts for the different related editing activities are the following:
a. Edit/change Element t"images/caepipe-generate-piperack2.gif"ypes
b. Edit/change Data types
c. Edit/change other spreadsheet data
d. Insert/delete rows (next month)
e. A few interesting editing features (next month, split an element, change data for a whole block of rows, make copies of existing piping).
a. Edit/change/delete Element types
Edit: You may want to change the default data or data you have previously input. To do that, you need to edit the element Type. Press Ctrl T (from anywhere on the row) to edit the element. For a bend, the bend dialog box opens.
Change: You can change an existing type to any other. CAEPIPE asks you for a confirmation before doing it. TAB over to the Type field. Say you want to change a "Rigid" element to a "Valve". Backspace through the characters "Rigid" and type "v". You cannot change a "Location" type to anything else or any other element to a "location" type as it physically does not make sense. A "location" is merely a placeholder for a support/hanger etc. "Location" is not an element type.
Delete: You cannot just delete an element type. You may, of course, delete a row completely.
Note:
1. A pipe element is the default element type. You do not have to type P to insert one (or select Pipe from the list) when you are defining a pipe for the first time on the row. Also, a pipe has no editable data, and Ctrl T would do nothing.
b. Edit/change Data types
Edit: Several times, you may have a need to change the default data or the data you have input previously. To do that, you need to edit the data type. Press Ctrl D (from anywhere on the row) to edit the item. Note: A Threaded Joint has no editable data, and Ctrl D would do nothing. Ctrl+D for Anchor will let you change stiffnesses, add/remove specified displacements etc.
Change: To change one type of Data (say, an Anchor) to another type (say, Guide), you will have to go through a couple of steps.
1. Press Ctrl+D to get to the Data field. Backspace or Delete the word Anchor in the field, and,
2. Type 'g' for guide. In some cases, you may have to press Enter.
c. Edit/change other spreadsheet data
For other data editing, use the TAB and the Backspace key to navigate and delete data respectively.
- To change the offset, for example, TAB over to the field, use the Delete key to erase the entry and type in the new offset.
- To change the material name, TAB over to the material field, use the Delete key to erase the entry and type in the new name.
- To change the node number, TAB over to the node field, use the Delete key to erase the node #, type in the new one. Select "Yes" in the confirmation dialog.
It is best to press Enter after any data change on the spreadsheet so the data becomes part of model.
A few examples of modeling shortcuts:
- If you are modeling a pipe on a row, after you type in the node number, you do not have to press TAB (or reposition mouse pointer) to move to DX to enter the offset, just press Enter after typing in the node number and a pipe element is automatically inserted and the cursor is placed in the DX column (saves you 3 keystrokes!).
- Say you need to input an Anchor for a row after having typed in a DX offset, no need to TAB over (6 times) to Data column or move your hand from the keyboard to the mouse to click in Data, merely press Ctrl D. This will place cursor in the Data column, now type A. That is it. CAEPIPE inserts an Anchor and moves the cursor over to the next row.
- Say the cursor in the last column, and you want to change the bend element's radius, merely press Ctrl+T and change the radius.
- If you are putting in a pipe (with a DX offset), type the node number, press Enter, the cursor is placed in DX. No need to press TAB twice to get to DX. Press TAB now to get to DY or DZ.
- For offsets, there is no need to specify the inch symbol for lengths such as x'y" (eg., type 4'6, TAB). For y" however, you need the inch symbol.
- Remember that the left/right arrow keys are circular in their movement through the fields on the layout screen. It is better to use the left arrow key to move more rapidly to a field than the right arrow key (because the right arrow key moves through each of the characters in the data).
Next month, we will look at a few interesting features in the Edit menu that aid rapid editing.
How to Improve Your Efficiency Using CAEPIPE?
Part 4a - The "Generate" Command
From input (Part 1, Part 2, Part 3, see above), this month we take a look at only the Generate command.
The Generate command is available under the Edit menu in the Layout window.
This command lets you duplicate or copy existing data in the Layout window (spreadsheet). Examples could be copying existing expansion loops, piperacks, creating multiple segments of uniform sloped piping, or buried piping, or stacks of piping, among other creative uses.
We will discuss four examples. This tip will cover two this month. We will finish this tip by covering two more in the next month.
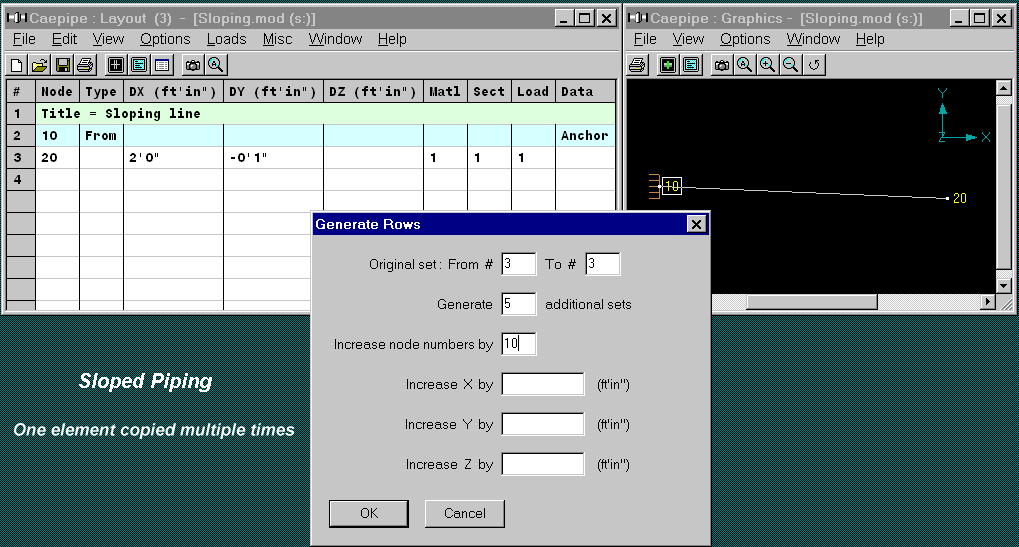
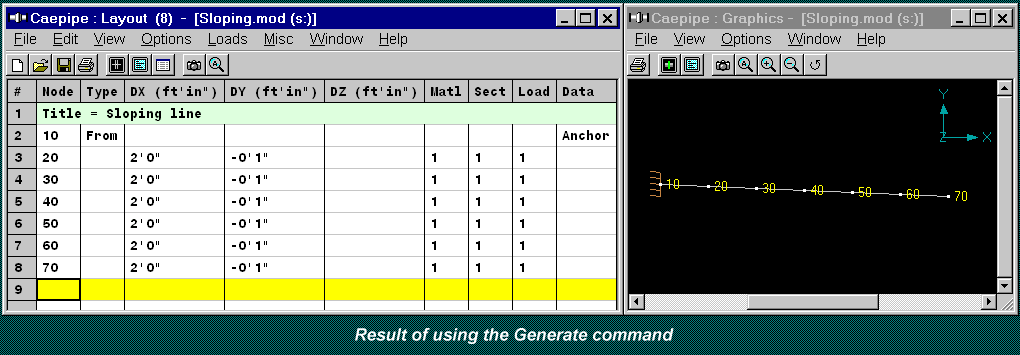
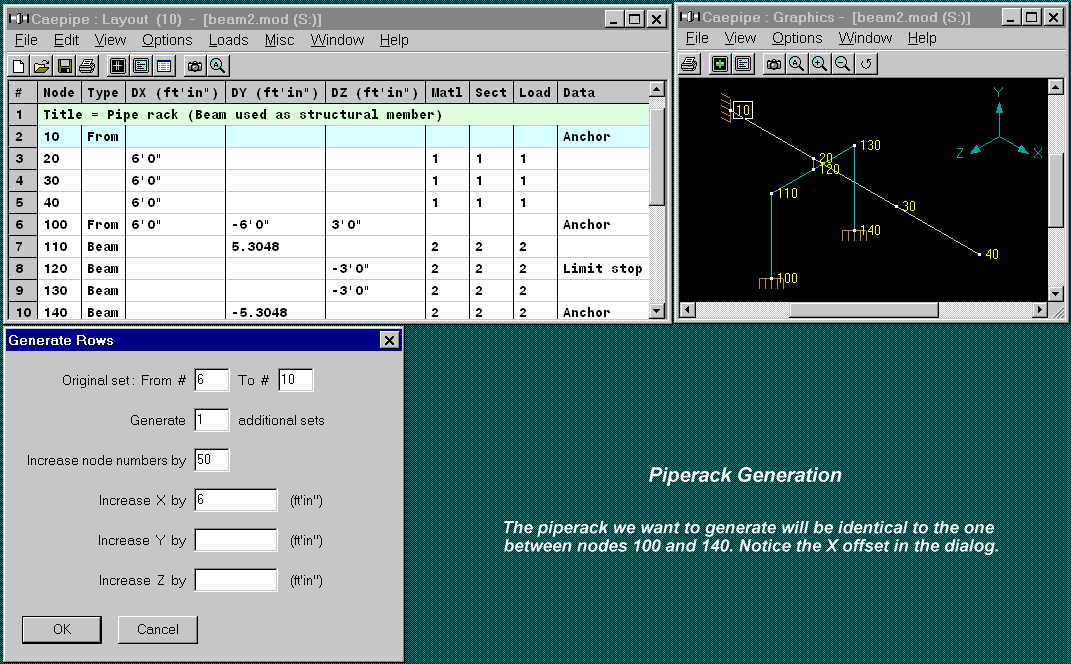
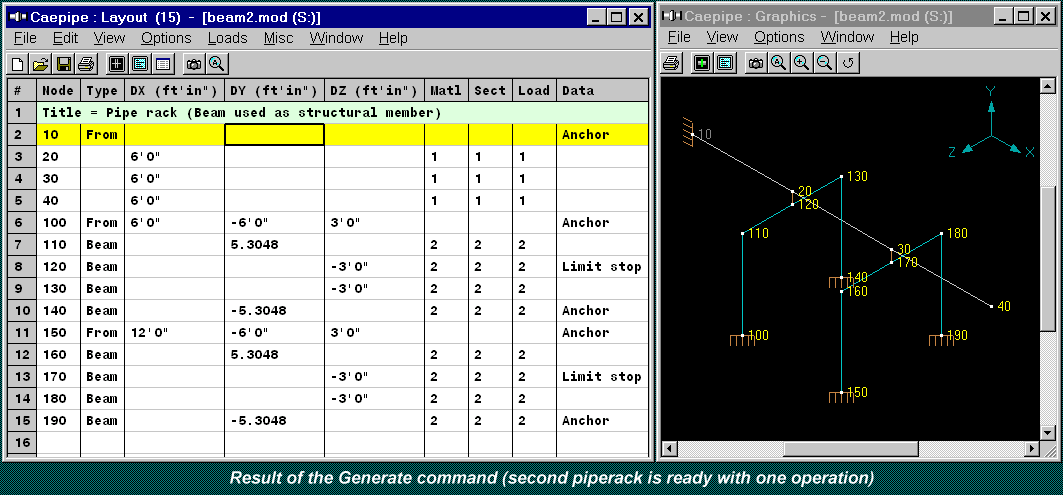
The pictures tell the story!
First example: Sloped piping
Objective is to create multiple segments with the same offset and slope. So, create one, and let Generate do the rest. See figures below. The first one is "before" and the next one is "after" the Generate command.


Second example: Piperack generation
Here, observe the first figure that has one rack between the nodes 100 to 140. The objective is to generate another (or more) at node 30. So, essentially, we need to "bodily lift" the first rack and move it 6ft. in the X direction. That is precisely what the Generate command does. Notice the "before" and the "after" figures.


Next month, we will look at two more examples, a bit more involved, and definite time savers.

