
Software Solutions
- CAEPIPE
- CAEPIPE 3D+
- checkSTRESS
- dataTRANSLATORS
- HOTclash
- PEXit
- Pricing Request
- Download Free Evaluation
- Download CAEPIPE 3D+
- Download Free Review Module
- Customer Support
Engineering Services
- Design and Engineering
- INFOplant™ System
- Engineering Management
- List of Projects
- Project Gallery
- Project Videos
Learn More
Company Information
Tips October - December 2001
Local Shell Flexibility and Stresses at Nozzles
Nozzles are mostly attached to the cylindrical or torispherical head portion of pressure vessels and tanks, whereas lugs are attached mostly to the cylindrical portion. When the nozzle is much thicker than the vessel, the nozzle behaves like a rigid inclusion in the vessel (i.e., like a lug attachment). Hence, we discuss here only the local shell behavior at nozzles.
For radial force and lateral moments at nozzles, torispherical head is stiffer than cylindrical shell. This is because cylindrical shell ovalizes for such external loadings, while spherical shell does not. For example, a cylindrical shell deforms as shown in figure below for a radial load.
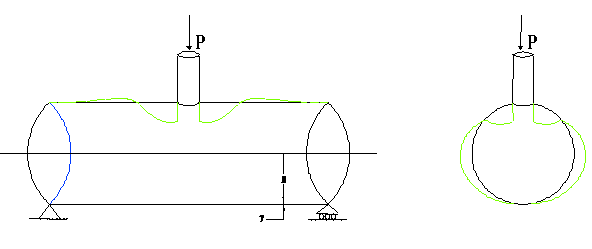
For a thin shell, where R/T is large (say, R/T >> 10), the shell for nozzle loads may be as flexible as the attached piping. In such cases, the local shell flexibility should be included in pipe stress analysis. If, instead, the nozzle is modeled as an anchor, the resulting pipe stresses and support reactions would be different from those for a pipe stress model with a flexible nozzle.
To include local shell flexibility, you need to define a Nozzle data type at the node in question. Once done, in the Layout window, use List > Nozzle Stiffnesses to display the stiffensses.
How to Edit/Create a Material Library in CAEPIPE
It couldn't be easier to edit an existing material library or create a new one in CAEPIPE.
TO EDIT:
Execute CAEPIPE, select File menu>Open>set Files of type to Material library files (*.mat). Click on B311.mat (or B313.mat). Once the library is opened, you can insert, delete or modify an existing material entry.
Once you insert or modify a material entry, it is necessary to press Enter with the cursor in the left hand side table (say, with the cursor in the Description field). This will enter the material into the database.
To add a material, simply go to the end of the table to a new row and start typing information. Move to the right hand side subtable to enter temperature, alpha, modulus, allowable etc. Once done on the right hand side, move the cursor to the left hand side and press ENTER.
To edit an existing material, place highlight on the material to be edited, and start changing information. Once done, press Enter.
After all editing and adding activites are over, save file and close. Now, load a piping model file. The new material will be available once you open the library from within the model (under Ctrl+Shift+M).
TO CREATE:
To create a new library file, select File menu>New. Select Material Library file. Once inside, follow instructions above.
Element Forces in CAEPIPE
In CAEPIPE results, Element forces (and moments) are shown for each element in the piping model. There are two screens that show element forces: 1. Pipe elements, 2. All other elements (such as valves, expansion joints, etc.). Element forces may be displayed either in local or global coordinate system.
Except the network (piping end nodes) endpoints, intermediate pipe element node numbers appear twice (one below the other) in the Element forces screen. All other non-pipe elements appear under Other Element forces (Press F6 from the Element forces screen).
Example: For pipe elements 10 to 20 and 20 to 30, element forces are reported for two elements shown next to each other with node 20 shown twice (once for each element).
Shouldn't forces and moments be equal and opposite at every common node?
Yes. The element forces at the common node should be equal and opposite unless the common node has a
- Force (externally applied)
- Concentrated mass,
- Weight (e.g., from a Flange),
- a Support, among other things.
Note that different weight distribution does not cause unequal forces.
Refer to any strength of materials book, e.g., "Introduction to Mechanics of Solids" by Egor P. Popov, Chapter 2: Axial force, Shear and Bending moment in Beams, for more information.