Software Solutions
- CAEPIPE
- CAEPIPE 3D+
- checkSTRESS
- dataTRANSLATORS
- HOTclash
- PEXit
- Pricing Request
- Download Free Evaluation
- Download CAEPIPE 3D+
- Download Free Review Module
- Customer Support
Engineering Services
- Design and Engineering
- INFOplant™ System
- Engineering Management
- List of Projects
- Project Gallery
- Project Videos
Learn More
Company Information
Tips October - December 2003
Checking for Piping Discontinuity
CAEPIPE can identify discontinuity in your pipe connections. This feature can come in handy when modeling complex or involved piping layouts. The command, "Check connections," is available under the menu Misc in the Layout window.
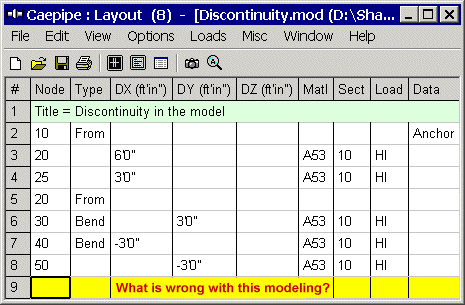
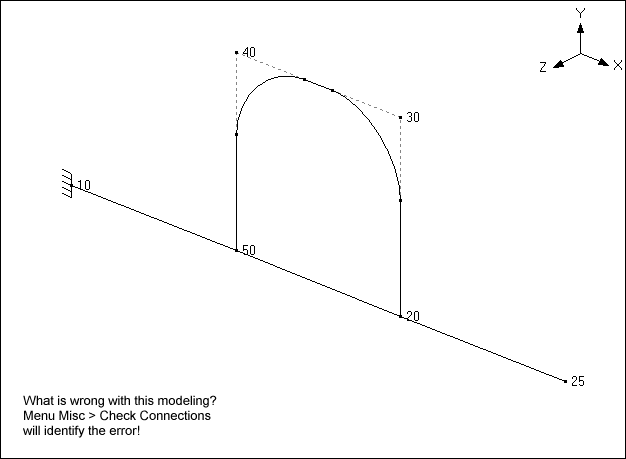
Use this command to check for missing connections between pipes. By studying the following two figures, can you identify what is wrong with the modeling? CAEPIPE can.
By studying the Layout window shown below, you will notice that even though node 50 seems to be on the header (node 10 to node 25), it actually is not. Node 10 connects directly to node 20 which connects to node 25. The loop begins from node 20 and goes up to node50. But 50 is not defined on the header! So, there is no closure for the loop with the header.
The solution, of course, is to add 50 between 10 and 20 while defining the header.


Support Load Summary
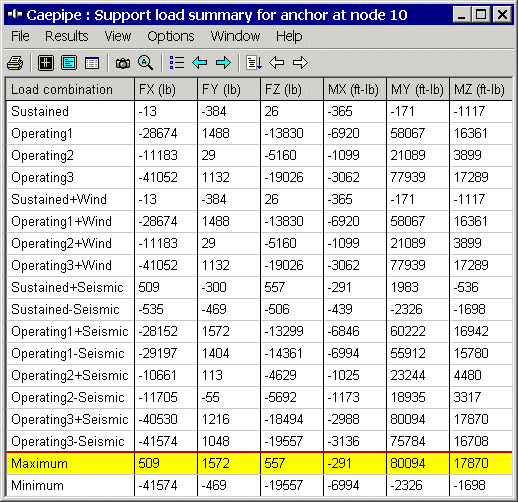
In addition to the listing of individual load case results available under "Support Loads," Caepipe results also provide a support by support summary of load combinations under "Support Load Summary" (see table below). This summary includes algebraic combinations of the individual loads which provide design basis loads for various applicable load combinations or conditions. The various combinations are useful when designing to criteria which are different for different loading conditions.
A couple of points regarding the summary follow.
Note that for unsigned cases, combinations with other loads include both a positive and negative case combination, e.g., Operating1 + Seismic and Operating1 - Seismic. What this means is that a seismic load is assumed to act in both the positive and the negative directions. When you examine these two rows in the table below, you will find that the largest positive FY results from Operating1 + Seismic (1572 lb) while the largest negative MX results from Operating 1 - Seismic (-6994 ft-lb.). This suggests that both cases (Operating1 + Seismic and Operating1 - Seismic) need to be considered.
Maximum and Minimum loads: It is possible for any load component to have the same sign under both the maximum and minimum loads, a potentially confusing circumstance. For example, MX in the table below includes a minimum load of -6,994 ft-lb. and a maximum load of -291 ft-lb. These load totals result because they are determined algebraically, not absolutely, and mean that under all conditions considered the support will see only negative loading. In this case, the support should be designed to handle a range of loading from 291 to 6994 ft-lb. in the negative X direction.
To see summaries for other supports, either click on the Other Supports button on the toolbar or click on the white arrows next to the button.
This article was contributed by Robert E. Serb, P.E., of PPEA Associates.

How to Perform Block Edit Operations
You probably already know this. If you don't, you need to. This can make your job much easier.
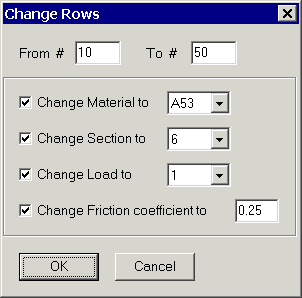
Using this command, you can change Material/Section/Load/Friction Coefficient in one operation.
In Layout, use menu Edit > Change command for block operations such as changing a friction coefficient for all guides and limit stops within a range of rows, or changing the material, section or load for a range of rows. You are asked for the range when you select this command from the Edit menu. Be sure to enter row numbers (not node numbers). If you want to change till the end of the model and you do not know the exact row #, simply enter 9999 (to designate end of model).


