
Software Solutions
- CAEPIPE
- CAEPIPE 3D+
- checkSTRESS
- dataTRANSLATORS
- HOTclash
- PEXit
- Pricing Request
- Download Free Evaluation
- Download CAEPIPE 3D+
- Download Free Review Module
- Customer Support
Engineering Services
- Design and Engineering
- INFOplant™ System
- Engineering Management
- List of Projects
- Project Gallery
- Project Videos
Learn More
Company Information
Tips October - December 2005
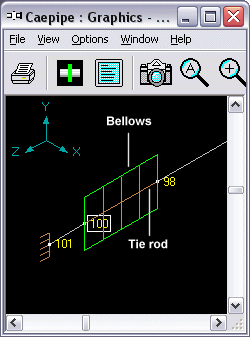
Modeling Tie Rods Correctly
A tie rod's chief function is to restrain the axial pressure thrust at an expansion joint (e.g., bellows). A tie rod between the ends of an expansion joint could be modeled to allow for axial compression but prevent axial expansion due to pressure thrust. To create this effect, you would need to model a tie rod *and* enter pressure thrust area for the bellows expansion joint.
For a tie rod, enter stiffnesses in tension and compression. To prevent the expansion joint from going into tension, input a Rigid stiffness (1E12 lb/in) for the Tension Stiffness field. Leave the Compression Stiffness blank if you want to allow the expansion joint to freely compress. Instead of making the Tension stiffness rigid, you could calculate the total stiffness of all the rods and enter it for Tension Stiffness.
In some cases, the expansion joint may move a specific distance before it stops moving completely. To model this, i.e., if you want to prevent the expansion joint from moving freely in a direction, input a gap in that direction and a corresponding stiffness.
How to model:
A tie rod is modeled between the same nodes as the expansion joint is. So, after you are done modeing the joint, go to a new row, type in the starting node number of the joint, specify "From" under "Type" followed by Enter. On the next new row, type the other node number of the joint, followed by "Tie Rod" under "Type". There is no need to input the offsets (DX, DY or DZ) as CAEPIPE already has the coordinates of these nodes from the previous expansion joint definition.
How To Specify Displacements at a Support
User Question: In my model, the anchor is representative of the vessel that the limit stop is attached to. This allows the user to give a displacement to the limit stop via the anchor, which will show thermal growth of vessel. How do I do it?
Reply: CAEPIPE has two Data types at which you can specify displacements. One is an Anchor and the other a Nozzle.
To input a specified displacement at an arbitrary support, say a limit stop, you need to do the following.
Create a "dummy" anchor node. This dummy node needs to be modeled with coordinates. One method is to note the coordinates of the limit stop node itself (by looking at Misc > Coordinates > Limit stop node) and model the dummy node with the same coordinates. Another method is to model the dummy node close by. In the first method, essentially, we would be putting the limit stop node and the dummy node at the same location. When you create a dummy node, you will enter the node # on a separate row, and make it a Type "From". Then, put an Anchor under the Data type column. Click on Displacements in the Anchor dialog, and enter the "thermal growth of the vessel" in the required direction (X, Y Z, etc.). Click on OK and exit.
Now, go back to the Limit stop, double click on it to edit, and type in the dummy anchor node number in the "Connected To Node" field. That is it. CAEPIPE connects the two data types (anchor and limit stop in this case) with a rigid link. So, the Limit stop will see the same displacement you entered at the Anchor.
You can use this method to model any movement at any support as long as that support in CAEPIPE can be connected to another node using the "Connected To Node" field.
Note that since hangers are vertical supports, the nodes that you specify in the "Connected To Node" fields must be above the pipe nodes where the hangers are.