Software Solutions
- CAEPIPE
- CAEPIPE 3D+
- checkSTRESS
- dataTRANSLATORS
- HOTclash
- PEXit
- Pricing Request
- Download Free Evaluation
- Download CAEPIPE 3D+
- Download Free Review Module
- Customer Support
Engineering Services
- Design and Engineering
- INFOplant™ System
- Engineering Management
- List of Projects
- Project Gallery
- Project Videos
Learn More
Company Information
Tips January - March 2006
Apply SIFs For Welded Attachments To Pipe?
User Question: I have heard two schools of thought concerning welded attachments to pipe, particularly stanchions. One group of stress analysts say that you apply an SIF to the pipe for the welded stanchion because the weld itself will introduce an SIF on the pipe due to the potential buildup of stress that is basically equivalent to a branch SIF (for conservatism). Another group says that you do not apply an SIF when analyzing a pipe because there is no hole in the pipe where stress can build up. Could you clarify which group is correct? Also, how does this affect welded pipe (e.g. API 5L)?
Reply: There will be some stress intensification in welded attachments to pipe but it would most likely be less than that of a branch connection.
The branch connection SIF applies to the branch only; the run SIF is not defined (there is one or used to be one in the Nuclear Class 2 piping rules) and would also be less than the branch SIF. It is normal for detailing to reduce the increase in local stresses to acceptable levels, i.e., use a pad under the stanchion if the run pipe is less than Sch. 40 to bring the wall thickness plus pad near the Sch. 40 wall thickness.
API 5L pipe is not often used in power or process (B31.1 & B31.3) applications; in pipeline (B31.4 & B31.8) applications, there are rules that prohibit the direct attachment of stanchions to the pipe if the pressure stresses are high, i.e., a full encirclement device (effectively a pad) is required in such cases.
Author: Mr. Ron Haupt, P. E., of Pressure Piping Engineering (www.ppea.net) is a member of several piping code committees (B31, B31.1, B31.3, BPTCS, and others). He consults with us in the capacity of Nuclear QA Manager.
SA Hand Calculations Don't Match CAEPIPE's
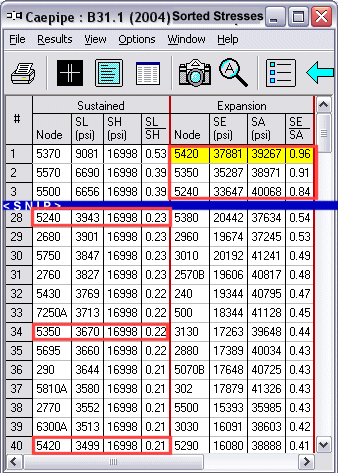
User Question: Regarding calculation of the allowable stress SA in B31.1. For node 5420, SL = 3499 psi and SA = 1 * [1.25* (17114 psi + 16998 psi) 3499 psi] = 39141 psi, different from the value 39266 psi shown in the Caepipe results. Same thing happens for node 5240. See results screens. In the case of node 5350 however, value shown in Caepipe results match with hand calculations. Please explain the differences.
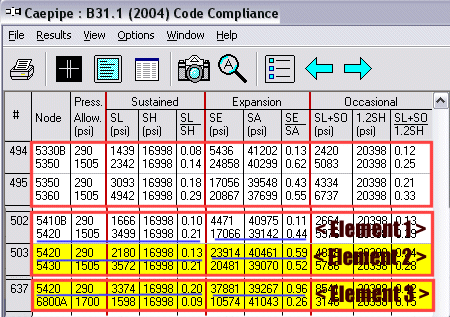
Reply: The nodes 5420 and 5240 and others like them in your model tmay display a different value for SA (under Sorted Stresses) from what you hand calculate because these nodes are tee junctions; three elements make up a tee. As such, there are three separate values for SL/SH and SE/SA for the common node such as 5240 and 5420. In the Sorted Stresses results, CAEPIPE always displays the numbers from that element (of the tee) for which the ratio (SL/SH or SE/SA) is the maximum.
CAEPIPE reports element 1's ratio under SL/SH, but reports element 3's ratio under SE/SA because each element has the max. corresponding ratio.

When you examine the numbers for the different elements, you will see that SE/SA for node 5420 for example has the max. SE/SA ratio (0.96) at element 3 compared to elements 1 and 2 of the tee.
Sample Calculations for node 5420: SA = f * (1.25 * (SC + SH) - SL) (equation used when you select the "Use Liberal Allowable Stresses" option in Layout), (SC = 17114 psi, f=1.0):
Element 1: 5410B - 5420 at node 5420, SL = 3499 (psi), SH = 16998 (psi), SE = 17066 (psi) and SA = 39141 (psi), SL/SH=0.21, SE/SA=0.44
Element 2: 5420 - 5430 at node 5420, SL = 2180 (psi), SH = 16998 (psi), SE = 23914 (psi) and SA = 40460 (psi), SL/SH=0.13, SE/SA=0.59
Element 3: 6800A - 5420 at node 5420, SL = 3374 (psi), SH = 16998 (psi), SE = 37881 (psi) and SA = 39266 (psi), SL/SH=0.20, SE/SA=0.96

From the above, you can see that the maximum Sustained stress ratio SL/SH is for element # 1 (0.21). The maximum Expansion stress ratio SE/SA is for element # 3 (0.96), different from the element (#1) with the max. SL/SH. Both have the common node 5420.
So, your SA calculation should be:
For node 5420, SL = 3374 psi (for element # 3) and SA = 1 * [1.25* (17114 + 16998) 3374 psi] = 39266 psi, as reported by CAEPIPE. The same procedure applies to Occasional stress ratios too.
B31.3 Sustained Stress At a Branch Connection
User Question: The Sustained (SL) stress for B31.3 code is not a multiple of the bending stress (M/Z) times the SIF at a reducing tee. For my model, the inplane bending moment at the tee center is 120 in-lb (out-of-plane is zero) and the inplane SIF is 6.78 (for an unreinforced tee) for 3"x1" tee (0.049"/0.035" thk). The model does not have internal pressure so there is no PD/4T term! Please explain.
Reply: The difference between the stress reported by CAEPIPE and what you would hand calculate by applying the SIF to M/Z is due to the fact that for a reduced outlet branch connection, stress at the branch is calculated using an effective section modulus, not the corroded section modulus. ASME B31.3 Para. 319.4.4 addresses this subject. That code section includes the applicable equation, Equation (21), and related variable definitions. Substituting Z(e) (effective section modulus) for Z in the equation iM/Z results in a stress of 22,713 psi as reported by CAEPIPE.
The thickness (t) to be used for the effective section modulus is the lesser of i(i)*t(b) or t(h) where, t(b) = branch nominal thickness, t(h) = header nominal thickness, i(i) = in-plane SIF at branch; Z(e) = pi * r(2)^2 * t. So, if you use this equation to calculate Z and substitute into the iM/Z equation 20, you would get the same number computed by CAEPIPE. r(2) is mean branch cross-sectional radius.

